FTP uses a client and server program. The server program listens and waits for incoming client connections, and once a connection is established the two computers can communicate with each other and transfer files back and forth. A client program is needed to interact with the server (from a website designer/developer/manager's perspective) and upload/download files.
My favorite FTP client is FileZilla (note: FileZilla also provides a server program, but we're not going to be using that in this tutorial). It's free and it can do everything you would want to do with an FTP client - I've also never experienced any bugs or any other problems (that were not my own fault).
First, go to the FileZilla website to download the client program:
http://filezilla-project.org/

Go ahead and install it... I'll assume you know how to do that, as there is nothing that really sets the installation of FileZilla apart from installing any other program. Once you run it, it should look something like this (note, I removed 2 windows from the View - feel free to customize your view however you like):

FileZilla's website has some good screenshots and tutorials. Before I begin, I'll provide you with some good links I've found in case you have any further general questions about its usage:
http://filezilla-project.org/client_screenshots.php
http://wiki.filezilla-project.org/FileZilla_Client_Tutorial_%28en%29
http://wiki.filezilla-project.org/Using
http://wiki.filezilla-project.org/FAQ#FileZilla_Client_FAQ
The first thing you will want to do to connect to your website is open the Site Manager. You can do this by clicking on the button shown below (at the top left of FileZilla):

I have websites in my Site Manager, of course, so I'm going to use FileZilla's screenshot of the Site Manager. Once the Site Manager is opened, it should look like this:
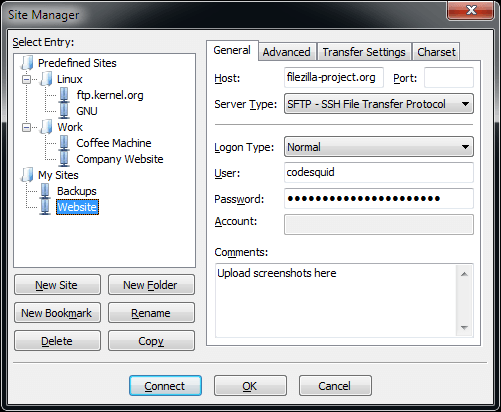
On the left side of the Site Manager is a Select Entry section. Here you can add websites that will be stored for future FTP connections, and you can use standard file/folder organization as well as renaming, copying, deleting, etc. These are not actual folders, they're just named as such so you can relate to the organization of websites better.
Click the New Site button, and name your website. I tend to just use the URL of the website I'm adding as the name so it's easy to identify. With your site selected on the left side, now you can enter the FTP connection information on the right side.
Note: everything we will be doing in this tutorial is in the General tab. I've never used the other 3 tabs before, but obviously they're there for a reason so some of you may end up using them eventually.
This is the tricky part: what information do you need to enter in the Site Manager for your website before you can connect and start transferring files?
From my experience, as soon as you sign up for web hosting, some webhosts will send you an email giving you the FTP details (and any particulars) you will need to connect. If not (then you probably have to create FTP accounts in your CPanel), or if you don't have the email handy, then no worries: you can almost always find this information by logging in to your CPanel... On the to CPanel!

Now that you're logged in to your CPanel, click on the FTP Accounts button:

It should look like this:

This may look a lot harder for you than it actually is. Simply enter a username and password, and enter a specific directory that you want to restrict the user's FTP access to (or leave it blank otherwise), and finally place a quota on the number of megabytes you want to restrict that user to be able to use.
Note: I've looked in the documentation for more information on the quota, as I've never really used it before. It seems to be a non-periodical quota. In other words, I don't think it recycles or regenerates every so often - it's just a one time constraint.
Let's say that you enter in "username" in the first box, "password" in the second and third boxes, leave the fourth box empty, set the quota to unlimited, and then click "Create FTP Account". This is the information you will enter into FileZilla, then (login username is based off of the "@x3demob.cpx3demo.com" in the picture above - this will vary based on your web host and its setup and such):
Logon Type: Normal
User: username@x3demob.cpx3demo.com
Password: password
There is some missing information here that we have not yet addressed for the full FTP client login information entering process yet, and I will cover it now. In CPanel, you can find out the rest of the information very easily. Just click the "Configure FTP Client" link down below the account creation form:

When you do, a box full of FTP client setup information will appear on the same page. Now I will go over every single setting in the General tab of the FileZilla Site Manager.
Host: the FTP Server listed in the information provided by CPanel.
Port: oftentimes not needed, although from time to time I've had to set this value. The default value (that CPanel also uses by default) is 21. I've had to use port 80 to get it to work once before. It all depends on what your server's FTP configuration is, but if no port is specified you can assume port 21 and just leave this box empty.
Protocol: FTP - File Transfer Protocol. I've never had to change this.
Encryption: use plain FTP. I've never had to change this (obviously not everyone will use FTP like me though).
Logon Type: usually Normal. I don't think I've ever used anything else. Normal makes it such that you can set a User and Password to log in with.
User: usually something like username@x3demob.cpx3demo.com.
Password: whatever you set it to be - in our case, it's just "password" (without quotes).
Account: never used this.
Comments: set comments on this particular website's setup for FileZilla's Site Manager if you wish.
When you're finished entering your website's information, click the Connect button at the bottom and FileZilla will attempt to connect to your web host's FTP. If it's not successful, then you'll basically just have to go back and double check everything - that's all I can say. If it is successful, you will see some files appear.
These are the two important areas you will probably end up utilizing to transfer files through FTP:

The right side is where the server's files and folders will appear. You can use drag and drop functionality to upload files to the server and download them from the server.
The left side is where your computer's files and folders are displayed. You can use either this area or your standard Windows "Explorer"/"Computer" (the window you use to navigate your computer's hard drives and files) to drag and drop files to and from your computer and server.
When you're finished, you can disconnect from the server by doing one of the following:
- Click Server > Disconnect (in the menu at the top of FileZilla).
- Press Ctrl+D in FileZilla (it's a hotkey for disconnecting from the currently connected server).
- Connect to another web host (this will display a prompt asking if you want to disconnect before connecting to the new web host).
- Close FileZilla.
Another topic I would like to cover very quickly is ASCII vs. Binary file transfer types. Basically, you can choose the method that your files are transferred to and from web servers. ASCII is the default, but sometimes problems can occur due to the contents of the files. I'm not an expert on this subject, but I have encountered this problem once or twice before, so I recommend you choose the binary setting.
Here are two ways to do that... The first way is to go into your FileZilla settings:

and then go to Transfers > File Types, and set the Default transfer type option to Binary. Then click OK and you're done:

The other method is simpler. Go to the Transfer tab, click on Transfer type, and choose Binary:

This option will only have to be set once per installation of FileZilla.
One last topic I would like to discuss is the saving and exporting of FileZilla website data. There is a special folder for FileZilla in the "Application Data" folder (in Windows), and in this folder will be an XML file containing all of your website data, including URL's, usernames, passwords, ports, etc. So, if you have multiple installations of FileZilla that will use the same setup, you can save a lot of time by exporting and importing this data. FileZilla's menu also has an option for this. More information can be found at this link:
http://wiki.filezilla-project.org/Other_Features
Now you know quite a lot about FileZilla. I will probably make another tutorial covering more aspects of file transferring, file permissions, etc. later. I hope this tutorial covered everything you needed to know, but if not, make sure to check for another tutorial and take a good look at those FileZilla links I provided earlier! :)

and then go to Transfers > File Types, and set the Default transfer type option to Binary. Then click OK and you're done:
The other method is simpler. Go to the Transfer tab, click on Transfer type, and choose Binary:
This option will only have to be set once per installation of FileZilla.
One last topic I would like to discuss is the saving and exporting of FileZilla website data. There is a special folder for FileZilla in the "Application Data" folder (in Windows), and in this folder will be an XML file containing all of your website data, including URL's, usernames, passwords, ports, etc. So, if you have multiple installations of FileZilla that will use the same setup, you can save a lot of time by exporting and importing this data. FileZilla's menu also has an option for this. More information can be found at this link:
http://wiki.filezilla-project.org/Other_Features
Now you know quite a lot about FileZilla. I will probably make another tutorial covering more aspects of file transferring, file permissions, etc. later. I hope this tutorial covered everything you needed to know, but if not, make sure to check for another tutorial and take a good look at those FileZilla links I provided earlier! :)
No comments:
Post a Comment